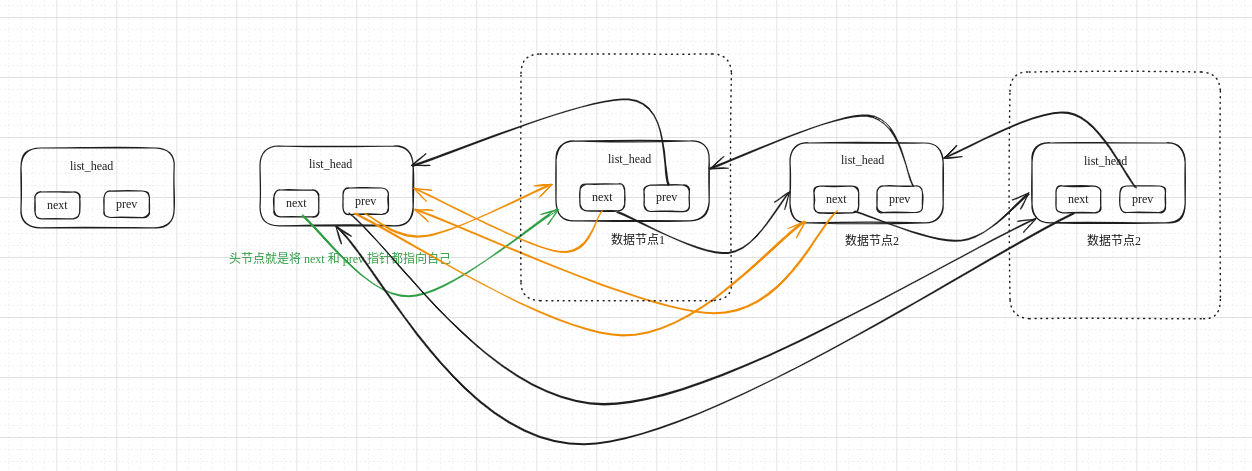
在此记录下Linux 下的链表笔记,首先看一下链表的结构体定义:
1
2
3
| struct list_head {
struct list_head *next, *prev;
};
|
list_head 结构体里面只有两个指向自己的指针,接下来看看怎么创建一个头指针。
创建头节点
Linux 内核提供了 LIST_HEAD() 宏,宏可以方便的创建一个 next 和 prev 都指向自己的头节点。
1
2
3
4
| #define LIST_HEAD_INIT(name) { &(name), &(name) }
#define LIST_HEAD(name) \
struct list_head name = LIST_HEAD_INIT(name)
|
例子:
上面宏展开后的样子:
1
| struct list_head my_list = { &(my_list), &(my_list) };
|
将 list_head 嵌入到自己的结构体中
我们在此创建一个 student 学生结构体如下:
1
2
3
4
5
6
7
8
9
10
11
12
13
| #define STUDENT_NAME_LEN 25
typedef unsigned char STUDENT_AGE_TYPE;
enum Sex { MALE, FEMALE };
struct student {
struct list_head list;
u64 id;
char name[STUDENT_NAME_LEN];
STUDENT_AGE_TYPE age;
enum Sex sex;
};
|
C 语言中结构体的第一个成员的地址就是结构体的首地址,和 C 中的数组类似。
插入数据
草图:

这里我们写了两个函数 list_add() 和 list_add_tail(),分别是向头部插入和向尾部插入。
其实也不复杂就是处理指针的指向而已,看不懂的照着草图慢慢研究。
1
2
3
4
5
6
7
8
9
10
11
12
13
14
15
16
17
18
19
20
21
22
23
24
25
26
27
28
29
| void list_add(struct list_head*new, struct list_head* head)
{
if (list_empty(head)) {
head->next = new;
head->prev = new;
new->next = head;
new->prev = head;
} else {
new->prev = head;
new->next = head->next;
head->next = new;
}
}
void list_add_tail(struct list_head* new, struct list_head *head)
{
if (list_empty(head)) {
head->next = new;
head->prev = new;
new->next = head;
new->prev = head;
} else {
head->prev->next = new;
new->next = head;
new->prev = head->prev;
head->prev = new;
}
}
|
将自定义数据插入链表中
这里定义了另一个函数 student_add()
1
2
3
4
5
6
7
8
9
10
| void student_add(u64 id, char *name, STUDENT_AGE_TYPE age, enum Sex sex,
struct list_head *head)
{
struct student *stu = (struct student *)malloc(sizeof(struct student));
stu->id = id;
snprintf(stu->name, sizeof(stu->name), "%s", name);
stu->age = age;
stu->sex = sex;
list_add_tail(&stu->list, head);
}
|
通过替换上面最后一行的 list_add_tail(&stu->list, head); 为 list_add(&stu->list, head); 即可切换插入的位置。
遍历打印链表
1
2
3
4
5
6
7
8
9
10
11
12
13
14
15
|
void student_print(struct list_head *head)
{
struct list_head *pos;
list_for_each(pos, head)
{
printf("id: %d, name: %s, age: %d, Sex: %s\n",
((struct student *)pos)->id, ((struct student *)pos)->name,
((struct student *)pos)->age, sex_get_str(((struct student *)pos)->sex));
}
}
|
遍历打印用到了一个新的宏 list_for_each(pos, head), 该宏展开后的样子:
1
| for (pos = (head)->next; !list_is_head(pos, (head)); pos = pos->next)
|
该宏的定义:
1
2
| #define list_for_each(pos, head) \
for (pos = (head)->next; !list_is_head(pos, (head)); pos = pos->next)
|
以上是最近学习 Linux 内核链表的一些笔记。


