WPF 中的 Style 和 html 中的 css 是类似的东西,都是定义UI样式,WPF 中的样式可以继承,下面就来了解下 WPF 中的样式使用方法。
定义一个简单的样式
这里我们给所有的 Button 定义一个样式,类似与 CSS 中的元素选择器,这里我们选择的元素就是 WPF 中的 Button。
1
2
3
4
5
6
7
8
9
10
11
12
13
14
15
16
17
18
19
20
21
22
| <Window
x:Class="Style.MainWindow"
xmlns="http://schemas.microsoft.com/winfx/2006/xaml/presentation"
xmlns:x="http://schemas.microsoft.com/winfx/2006/xaml"
xmlns:d="http://schemas.microsoft.com/expression/blend/2008"
xmlns:local="clr-namespace:Style"
xmlns:mc="http://schemas.openxmlformats.org/markup-compatibility/2006"
Title="MainWindow"
Width="800"
Height="450"
mc:Ignorable="d">
<Grid HorizontalAlignment="Center" VerticalAlignment="Center">
<Grid.RowDefinitions>
<RowDefinition />
</Grid.RowDefinitions>
<Grid.ColumnDefinitions>
<ColumnDefinition />
</Grid.ColumnDefinitions>
<Button Content="Ok" />
</Grid>
</Window>
|
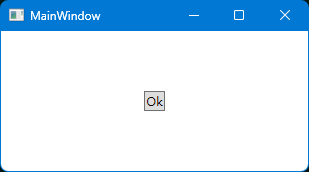
这是没有使用样式的代码,显示效果如下图。
使用样式的代码:
1
2
3
4
5
6
7
8
9
10
11
12
13
14
15
16
17
18
19
20
21
22
23
24
25
26
27
28
29
30
31
32
33
34
35
36
37
38
39
| <Window
x:Class="Style.MainWindow"
xmlns="http://schemas.microsoft.com/winfx/2006/xaml/presentation"
xmlns:x="http://schemas.microsoft.com/winfx/2006/xaml"
xmlns:d="http://schemas.microsoft.com/expression/blend/2008"
xmlns:local="clr-namespace:Style"
xmlns:mc="http://schemas.openxmlformats.org/markup-compatibility/2006"
Title="MainWindow"
Width="800"
Height="450"
mc:Ignorable="d">
<Grid HorizontalAlignment="Center" VerticalAlignment="Center">
<Grid.Resources>
<Style TargetType="{x:Type Button}">
<Setter Property="FontSize" Value="30" />
<Setter Property="Padding" Value="35,10,35,10" />
<Setter Property="Foreground">
<Setter.Value>
<SolidColorBrush Opacity="0.9" Color="#FF109895" />
</Setter.Value>
</Setter>
<Setter Property="Background">
<Setter.Value>
<SolidColorBrush Opacity="0.65" Color="#FFF9F9E1" />
</Setter.Value>
</Setter>
</Style>
</Grid.Resources>
<Grid.RowDefinitions>
<RowDefinition />
</Grid.RowDefinitions>
<Grid.ColumnDefinitions>
<ColumnDefinition />
</Grid.ColumnDefinitions>
<Button Content="Ok" />
</Grid>
</Window>
|
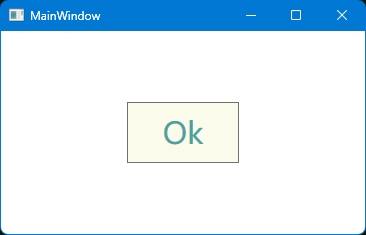
样式是要定义到布局元素上的,如:Grid、Window等都可以,这里写到了 Grid.Resources 下,这些样式只对 Grid 下的子元素有效。
这里在 Style 里指定 TargetType="Button" 来设置所有 Button 的样式,我们也可以个某个 Button 设置不同的样式,这里会用到继承。
1
2
3
4
5
6
7
8
9
10
11
12
13
14
15
16
17
18
19
20
21
22
23
24
25
26
27
28
29
30
31
32
33
34
35
36
37
38
39
40
41
42
43
44
45
46
47
48
49
50
51
52
53
54
55
56
57
58
59
60
61
62
63
64
65
66
67
68
| <Window
x:Class="Style.MainWindow"
xmlns="http://schemas.microsoft.com/winfx/2006/xaml/presentation"
xmlns:x="http://schemas.microsoft.com/winfx/2006/xaml"
xmlns:d="http://schemas.microsoft.com/expression/blend/2008"
xmlns:local="clr-namespace:Style"
xmlns:mc="http://schemas.openxmlformats.org/markup-compatibility/2006"
Title="MainWindow"
Width="800"
Height="450"
mc:Ignorable="d">
<Grid HorizontalAlignment="Center" VerticalAlignment="Center">
<Grid.Resources>
<Style x:Key="LeftMarginButtonBase" TargetType="Button">
<Setter Property="Margin" Value="12,0,0,0" />
<Setter Property="FontSize" Value="30" />
<Setter Property="Padding" Value="35,10,35,10" />
</Style>
<Style TargetType="{x:Type Button}">
<Setter Property="FontSize" Value="30" />
<Setter Property="Padding" Value="35,10,35,10" />
<Setter Property="Foreground">
<Setter.Value>
<SolidColorBrush Opacity="0.9" Color="#FF109895" />
</Setter.Value>
</Setter>
<Setter Property="Background">
<Setter.Value>
<SolidColorBrush Opacity="0.65" Color="#FFF9F9E1" />
</Setter.Value>
</Setter>
</Style>
<Style
x:Key="RedButton"
BasedOn="{StaticResource LeftMarginButtonBase}"
TargetType="Button">
<Setter Property="Foreground" Value="Red" />
</Style>
<Style
x:Key="YellowButton"
BasedOn="{StaticResource LeftMarginButtonBase}"
TargetType="Button">
<Setter Property="Foreground" Value="Yellow" />
<Setter Property="Background" Value="Black" />
</Style>
</Grid.Resources>
<Grid.RowDefinitions>
<RowDefinition />
</Grid.RowDefinitions>
<Grid.ColumnDefinitions>
<ColumnDefinition />
</Grid.ColumnDefinitions>
<StackPanel Orientation="Horizontal">
<Button Content="Ok" />
<Button Content="Ok" Style="{StaticResource RedButton}" />
<Button Content="Ok" Style="{StaticResource YellowButton}" />
</StackPanel>
</Grid>
</Window>
|
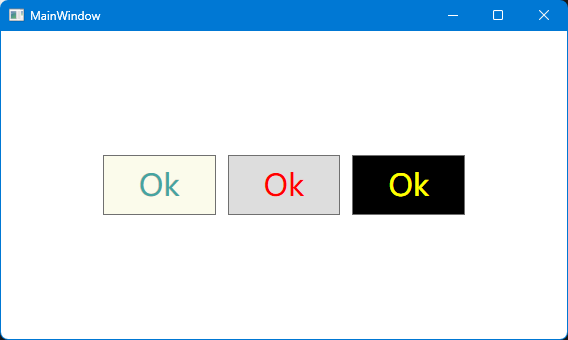
这个例子中定义了一个带左侧Margin的Button基础样式LeftMarginButtonBase。
Padding,Margin
可以整体对左上右下四个方向设置间距,也可以对每个方向设置不同的间距。
1
| <Setter Property="Margin" Value="12,13,14,15" />
|
画刷
WPF(Windows Presentation Foundation)中有多种画刷类型,用于填充形状、文本或其他可绘制的元素。以下是几种常见的画刷类型:
实心画刷(SolidColorBrush)
实心画刷例子如下:
1
2
3
4
5
6
7
8
9
10
11
12
13
14
| <Style TargetType="{x:Type Button}">
<Setter Property="FontSize" Value="30" />
<Setter Property="Padding" Value="35,10,35,10" />
<Setter Property="Foreground">
<Setter.Value>
<SolidColorBrush Opacity="0.9" Color="#FF109895" />
</Setter.Value>
</Setter>
<Setter Property="Background">
<Setter.Value>
<SolidColorBrush Opacity="0.65" Color="#FFF9F9E1" />
</Setter.Value>
</Setter>
</Style>
|
实心画刷可以设置Color和Opacity两个属性。
梯度画刷(GradientBrush)
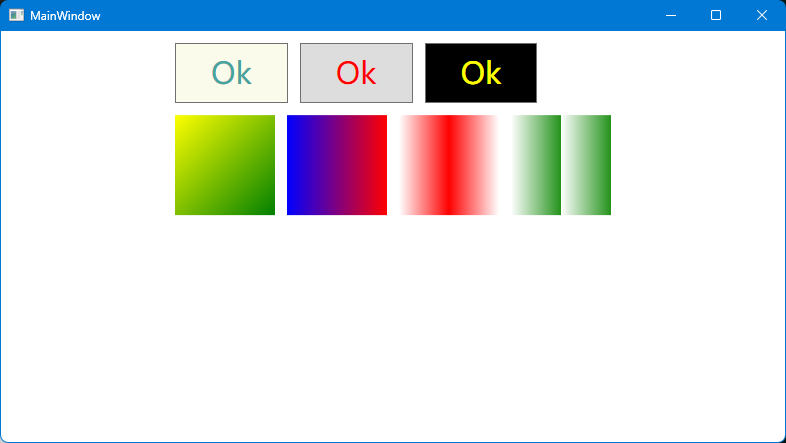
GradientStop:这是用于定义渐变的颜色和位置的对象。其中,Offset 属性指定梯度停止点的颜色在渐变轴上的位置。偏移量是一个介于 0 到 1 之间的双精度值。梯度停止点的偏移值越接近 0,颜色就越接近渐变的起点。
LinearGradientBrush 线性渐变
1
2
3
4
5
6
7
8
| <Rectangle>
<Rectangle.Fill>
<LinearGradientBrush StartPoint="0,0" EndPoint="1,0">
<GradientStop Color="Yellow" Offset="0"/>
<GradientStop Color="Green" Offset="1"/>
</LinearGradientBrush>
</Rectangle.Fill>
</Rectangle>
|
StartPoint
- 渐变画刷的起点,默认规定起点坐标是(0,0)。注:这里的 0 是指整个长度的0%的位置,而不是坐标为0。
EndPoint
- 渐变画刷的终点,默认规定终点坐标是(1,1)。注:这里的1是指整个长度的
100%的位置,而不是坐标为1。
MappingMode
- 指定渐变画笔的定位坐标解释方式。
- 可选值:
RelativeToBoundingBox(默认)和Absolute。
- 首先确定元素的大小
Width=100,Height=50
- 值为
RelativeToBoundingBox 时,起点坐标和终点坐标就是(0,0)和(1,1)
- 值为
Absolute 时,起点坐标和终点坐标就是 (0,0)和(100,50)
SpreadMethod
- 用于选择渐变的扩展类型
- 可选值:
Pad(默认),Reflect,Repeat
- 值为
Pad 时,渐变向量末端的颜色值填充剩余的空间。
- 值为
Reflect 时,按设置颜色的反方向重复渐变,直至充满空间。
- 值为
Repeat 时,按原始方向重复渐变,直至充满空间。
完整例子:
1
2
3
4
5
6
7
8
9
10
11
12
13
14
15
16
17
18
19
20
21
22
23
24
25
26
27
28
29
30
31
32
33
34
35
36
37
38
39
40
41
42
43
44
45
46
47
48
49
50
51
52
53
54
55
56
57
58
59
60
61
62
63
64
65
66
67
68
69
70
71
72
73
74
75
76
77
78
79
80
81
82
83
84
85
86
87
88
89
90
91
92
93
94
95
96
97
98
99
100
101
102
103
104
105
106
107
108
109
110
111
112
113
114
115
116
117
118
119
120
121
122
123
124
125
| <Window
x:Class="Style.MainWindow"
xmlns="http://schemas.microsoft.com/winfx/2006/xaml/presentation"
xmlns:x="http://schemas.microsoft.com/winfx/2006/xaml"
xmlns:d="http://schemas.microsoft.com/expression/blend/2008"
xmlns:local="clr-namespace:Style"
xmlns:mc="http://schemas.openxmlformats.org/markup-compatibility/2006"
Title="MainWindow"
Width="800"
Height="450"
MinWidth="400"
MinHeight="300"
Padding="12"
mc:Ignorable="d">
<Grid
Margin="12"
HorizontalAlignment="Center"
VerticalAlignment="Top">
<Grid.Resources>
<Style x:Key="LeftMarginButtonBase" TargetType="Button">
<Setter Property="Margin" Value="12,0,0,0" />
<Setter Property="FontSize" Value="30" />
<Setter Property="Padding" Value="35,10,35,10" />
</Style>
<Style TargetType="{x:Type Button}">
    <Setter Property="FontSize" Value="30" />
    <Setter Property="Padding" Value="35,10,35,10" />
    <Setter Property="Foreground">
        <Setter.Value>
            <SolidColorBrush Opacity="0.9" Color="#FF109895" />
        </Setter.Value>
    </Setter>
    <Setter Property="Background">
        <Setter.Value>
            <SolidColorBrush Opacity="0.65" Color="#FFF9F9E1" />
        </Setter.Value>
    </Setter>
</Style>
<Style
x:Key="RedButton"
BasedOn="{StaticResource LeftMarginButtonBase}"
TargetType="Button">
<Setter Property="Foreground" Value="Red" />
</Style>
<Style
x:Key="YellowButton"
BasedOn="{StaticResource LeftMarginButtonBase}"
TargetType="Button">
<Setter Property="Foreground" Value="Yellow" />
<Setter Property="Background" Value="Black" />
</Style>
<LinearGradientBrush x:Key="Brush1" SpreadMethod="Reflect" StartPoint="0,0" EndPoint="0.5,0">
<LinearGradientBrush.GradientStops>
<GradientStop Offset="0" Color="White" />
<GradientStop Offset="1" Color="Red" />
</LinearGradientBrush.GradientStops>
</LinearGradientBrush>
<LinearGradientBrush x:Key="Brush2" SpreadMethod="Repeat" StartPoint="0,0" EndPoint="0.5,0">
<LinearGradientBrush.GradientStops>
<GradientStop Offset="0" Color="White" />
<GradientStop Offset="1" Color="#FF23921A" />
</LinearGradientBrush.GradientStops>
</LinearGradientBrush>
</Grid.Resources>
<Grid.RowDefinitions>
<RowDefinition />
<RowDefinition />
</Grid.RowDefinitions>
<Grid.ColumnDefinitions>
<ColumnDefinition />
</Grid.ColumnDefinitions>
<StackPanel Margin="0,0,0,12" Orientation="Horizontal">
<Button Content="Ok" />
<Button Content="Ok" Style="{StaticResource RedButton}" />
<Button Content="Ok" Style="{StaticResource YellowButton}" />
</StackPanel>
<StackPanel Grid.Row="1" Orientation="Horizontal">
<Rectangle Width="100" Height="100">
<Rectangle.Fill>
<LinearGradientBrush StartPoint="0,0" EndPoint="1,1">
<LinearGradientBrush.GradientStops>
<GradientStop Offset="0" Color="Yellow" />
<GradientStop Offset="1" Color="Green" />
</LinearGradientBrush.GradientStops>
</LinearGradientBrush>
</Rectangle.Fill>
</Rectangle>
<Rectangle
Width="100"
Height="100"
Margin="12,0,0,0">
<Rectangle.Fill>
<LinearGradientBrush StartPoint="0,0" EndPoint="1,0">
<LinearGradientBrush.GradientStops>
<GradientStop Offset="0" Color="Blue" />
<GradientStop Offset="1" Color="Red" />
</LinearGradientBrush.GradientStops>
</LinearGradientBrush>
</Rectangle.Fill>
</Rectangle>
<Border
Width="100"
Height="100"
Margin="12,0,0,0"
Background="{StaticResource Brush1}" />
<Border
Width="100"
Height="100"
Margin="12,0,0,0"
Background="{StaticResource Brush2}" />
</StackPanel>
</Grid>
</Window>
|
圆形梯度画刷(RadialGradientBrush)
例子1
1
2
3
4
5
6
7
8
9
10
11
12
13
14
15
16
| <RadialGradientBrush x:Key="Brush4" GradientOrigin="0,0" RadiusX="0.5" RadiusY="0.5">
<RadialGradientBrush.GradientStops>
<GradientStop Offset="0" Color="Blue" />
<GradientStop Offset="1.0" Color="Red" />
</RadialGradientBrush.GradientStops>
</RadialGradientBrush>
<StackPanel
Grid.Row="2"
Margin="0,12,0,0"
Orientation="Horizontal">
<Border
Width="100"
Height="100"
Background="{StaticResource Brush4}" />
</StackPanel>
|
例子2
1
2
3
4
5
6
7
8
9
10
11
12
13
14
15
16
| <RadialGradientBrush x:Key="Brush4" GradientOrigin="0.5,0" RadiusX="0.5" RadiusY="0.5">
<RadialGradientBrush.GradientStops>
<GradientStop Offset="0" Color="Blue" />
<GradientStop Offset="1.0" Color="Red" />
</RadialGradientBrush.GradientStops>
</RadialGradientBrush>
<StackPanel
Grid.Row="2"
Margin="0,12,0,0"
Orientation="Horizontal">
<Border
Width="100"
Height="100"
Background="{StaticResource Brush4}" />
</StackPanel>
|
例子3
1
2
3
4
5
6
7
8
9
10
11
12
13
14
15
16
| <RadialGradientBrush x:Key="Brush4" GradientOrigin="0.5,0.5" RadiusX="0.5" RadiusY="0.5">
<RadialGradientBrush.GradientStops>
<GradientStop Offset="0" Color="Blue" />
<GradientStop Offset="1.0" Color="Red" />
</RadialGradientBrush.GradientStops>
</RadialGradientBrush>
<StackPanel
Grid.Row="2"
Margin="0,12,0,0"
Orientation="Horizontal">
<Border
Width="100"
Height="100"
Background="{StaticResource Brush4}" />
</StackPanel>
|
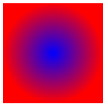
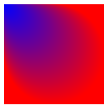
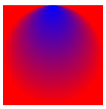
上面三个例子的唯一区别就是 GradientOrigin 属性的值不一样。
例子4
1
2
3
4
5
6
7
8
9
10
11
12
13
14
15
16
17
18
| <RadialGradientBrush x:Key="Brush4" GradientOrigin="0.5,0.5" RadiusX="0.5" RadiusY="0.5">
<RadialGradientBrush.GradientStops>
<GradientStop Offset="1" Color="Blue" />
<GradientStop Offset="0.75" Color="Red" />
<GradientStop Offset="0.35" Color="Green" />
<GradientStop Offset="0" Color="Yellow" />
</RadialGradientBrush.GradientStops>
</RadialGradientBrush>
<StackPanel
Grid.Row="2"
Margin="0,12,0,0"
Orientation="Horizontal">
<Border
Width="100"
Height="100"
Background="{StaticResource Brush4}" />
</StackPanel>
|

图像画刷(ImageBrush)
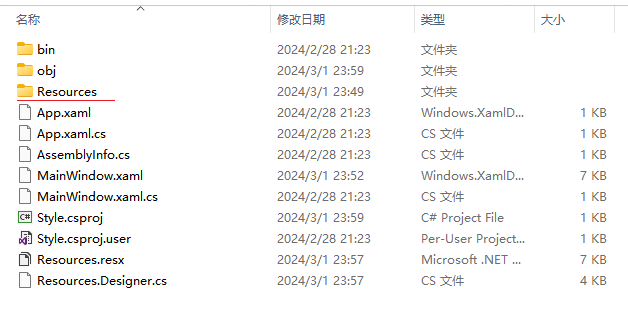
首先在项目根目录中新建一个 Resources 文件夹。
然后在 Resources 文件夹下放一些要用的图片。
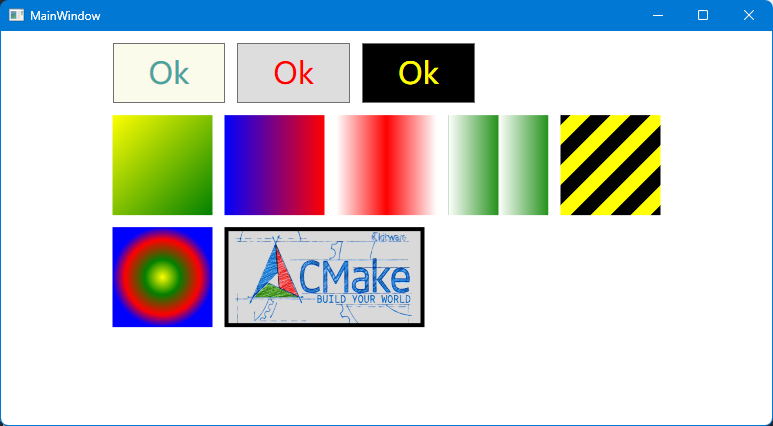
第一个例子:
1
2
3
4
5
6
7
8
9
| <Rectangle
Width="200"
Height="100"
Stroke="Black"
StrokeThickness="4">
<Rectangle.Fill>
<ImageBrush ImageSource="/Resources/cmake.png" />
</Rectangle.Fill>
</Rectangle>
|
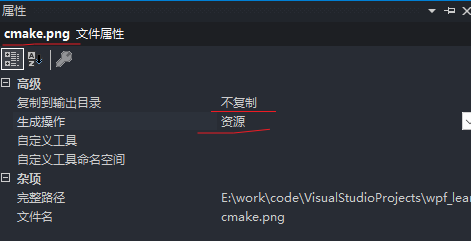
图片属性设置
控件画刷(VisualBrush)
自定义画刷(DrawingBrush)


